


INTRODUCTION
a.“.
Ir.
c
A TOUR AROUND GEMINI
L.
; e.
b
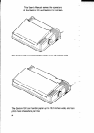
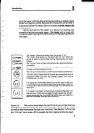
Let’s begin with a tour around the outside of the Gemini. On the
top, right, front part of your machine, you’ll see the controlpanel
(as shown in Figure l-l). These three buttons and the four status
lamps are your day-to-day operational controls. These are fully
explained later in this chapter, but for now we’ll move on because
this is an express tour.
On the right side of your printer is a large knob and, toward
the back, you’ll find the “on/off” power switch. The knob is
attached to the platen (pronounced platen), which is the padded
roller around which the paper is fed to the printing mechanism.
Hence, the handle is called the platen knob, and allows you to
manually turn the platen (with the power “off”), just like on a
typewriter.
The power switch, located on the lower right side, is the
“on/off” switch that controls the flow of electricitv to your
machine. The Gemini printers use A.C. power source found
in wall outlets of homes and offices. As a safety precaution,
you should make sure that your printer is turned “off” before
plugging the three-pronged safety plug into the electrical outlet.
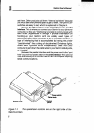
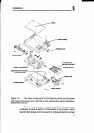
Turning the corner and examining the back of your machine
(as shown in Figure l-2), you’ll see the power cord, grounding
connector, interface ports, and DIP switches.
The DIPswitches (a popular acronym for the electronic term,
“dual in-line package”) control important printer functions. Some
companies call these “microswitches” because their engineers
made them so small you almost need a microscope to find and
Allow us to introduce you to your Gemini printer: “Gemini, this is
your new user:’ “User, this is the remarkable new Gemini - a
versatile and dependable printer that lets you do tricks with the
dot matrix and bit image capabilities?
In this chapter, we’ll answer the question: What are the parts
of the printer and how do they work together? We’ll define the
operating environment for Gemini, and we’ll discuss its technical
specifications. If you are just now unpacking your newly acquired
Gemini, refer to Appendix G to learn how the pieces fit together,
then return to this chapter to discover how to put your printer to
work for you.