


lnferfacing Geminl with Your Computer
SERIAL INTERFACE
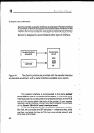
The serial interface requirementsvary with the type of connector
and type of device to which Gemini is interfaced. The serial
interface option can be purchased from your Gemini dealer and
is accompanied by its own documentation.
INITIALIZATION
In Chapter 5, you’ll get a quick course in putting Gemini to work
for you. But the first step is initialiling the printer for operation.
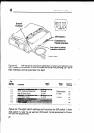
This can be accomplished in three ways. The easiest method
is to turn the power switch “off: then turn it back “on” again.
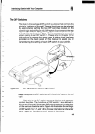
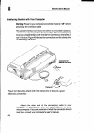
Another way is to apply the INPUT PRIME signal (parallel pin no.
31) to the interface connector (see Appendix ‘IN”). The third
method is by transmitting the ESC @ code to Gemini, as discussed
in Chapter 5 and 9.
Initializing Gemini is somewhat like “cleaning off the
blackboard” to get ready for the next printing assignment. All
special settings are cleared away and the “standard” character
size, line height, and number of lines per page are restored.
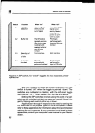
Altogether, six operations are accomplished when Gemini is
initialized.
1.
2.
3.
4.
5.
6.
The print head goes to its “home” position
(except in the case of ESC @).
The buffer contents are cleared.
The characters in download character
RAM are cleared (except in the case of ESC
es)-
Character pitch is set to 10 CPI or 17 CPI
according to DIP switch 1-3.
Line pitch is set to 116 inch or 118 inch
according to the DIP switch 1-5.
International characters and form length
are set according to the DIP switches 1-6,
1-7 and 1-8.
55