


Chapter 6 Installing an Additional Processor
52
NOTE No speed switch settings are required for the supported
processors (1.13 and 1.26 GHz) in the HP Netserver. These
processors rely on the internal settings within the processors
and do not rely on external switch settings on the system board.
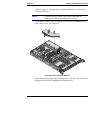
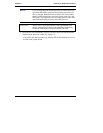
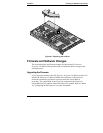
Installing the Heatsink
Once the processor is installed, the heatsink must be installed on top of the
processor. Each processor requires a heatsink and a thermal bonding between the
processor and the heatsink, provided by the thermal patch. The heatsink is
mechanically connected to the processor socket with both latches, mechanically
making contact with processor.
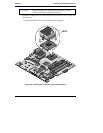
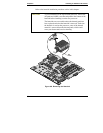
1. Remove the heatsink from the shipping container and ensure you do not touch
the thermal patch on the bottom of the heatsink.
CAUTION Ensure you have a good thermal patch for good contact with
the processor to avoid thermal overheating. If you have not
made good contact on the processor, it may shutdown to
prevent overheating.
The supported processors have thermal sensors inside the
processor chip to prevent overheating. If the processor runs
hot, it may operate intermittently or crash the system causing
data loss or file corruption. This may also lead to processor
damage. Refer to the indicators in Chapter 1, "Controls,
Ports, and Indicators."
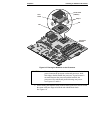
2. Inspect the thermal patch to ensure the thermal material covers the whole
patch.
a. If not, you must remove the old patch and replace it with a new thermal
patch. The heatsink kit should contain extra thermal patches. The thermal
patch is pealed off the backing and placed in the center of the heatsink in
the area marked.
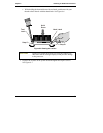
b. If you are re-installing a heatsink on to the processor, you may need to
scrap off any thermal material left on top of the processor chip. You can
use your fingernail to scrap off the material, but ensure you are grounded
with a static-dissipating wrist-strap.