


Chapter 6
Removing and Replacing Components
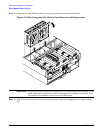
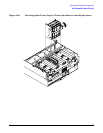
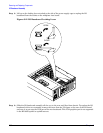
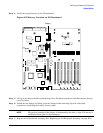
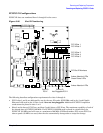
I/O Baseboard Assembly
212
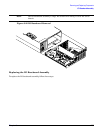
Step 8. Plug the internal SCSI cables into the HBA board in PCI slot 1.
Step 9. Replace the top cover. (See “Replacing the Top Cover” on page 183.)
Step 10. Reconnect all power and external cables and turn on the system.
Step 11. If you have installed a new I/O baseboard assembly, you must write the serial number and model
string data to the new I/O board. To write the data to the new board, follow these steps:
a. Locate the system serial number and note it for use in the following steps. The system serial
number can be found in the following two places:
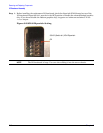
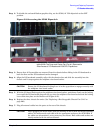
• At the right of the front bezel, above and immediately to the right of the disk drives, locate
the pull tab and extend the tab from the server to display product information. A label
containing the system serial number is attached to the pull tab.
• A label containing the system serial number is located on the right side of the chassis as you
face the server.
b. Monitor system startup on a terminal. At the BCH prompt, enter the SER command to display
the service menu.)
c. To access server information, enter the SER_INIT command.
•Use the SERN command to enter the original product and serial number.
• For PRODUCT NUMBER, enter the appropriate number (typically A9956A, A9951A, and
so on).
• For SYSTEM SERIAL NUMBER, enter the serial number from the pull tab or from the side
of the chassis.
• For MODEL STRING, enter the model string value applicable to your system. Valid choices
are as follows:
• 9000/800rp4440 PA8800 dc
• 9000/800rp4440 PA8900 dc
• 9000/800rp4410 PA8900 dc- Max 4 Core
• 9000/800rp4410#1 PA8900 dc- 1 Core
When prompted for approval, enter y.
d. To reset the system, enter the reset command.
e. Reset the server time and date, and restore the iLO MP configuration settings as described in
the following step.
Step 12. If you have installed a new battery on the I/O baseboard assembly or installed a new I/O baseboard
assembly, you might need to set the server time and date and restore the iLO MP configuration
settings. To set the time and date and restore the iLO MP configuration settings, follow these steps:
a. Using the system console, set the system time and date using the BCH DATE command.
b. Using the system console, configure the iLO MP. Incorporate settings saved before removing the
I/O baseboard assembly or set up the iLO MP as needed. For additional information about using
the iLO MP, see the HP Integrity and HP 9000 Integrated Lights-Out Management Processor
Operations Guide.