


Replacing the Cleaning Pad and Oil Bottle
This section covers replacing the cleaning pad and oil bottle in your
printer. The cleaning pad removes printing debris (such as excess
toner and paper dust) from the fusing unit. The oil helps prevent
toner from sticking to the fuser rollers.
Replace the oil bottle and cleaning pad when FUSER OIL LOW
or OUT OF OIL appears in the printer’s message window. The
first oil bottle and cleaning pad change is required at approximately
1,500 pages. After that, changes are required at approximately
3,000-page intervals. Changing these on a regular basis helps retain
optimal print quality.
Illustrations for many of the steps described in this section are in
chapter 2, “Initial Printer Setup.”
To replace the cleaning pad and oil bottle
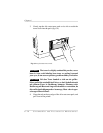
1. Turn off the main power switch on the back of the printer.
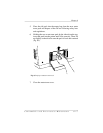
2. Remove the top cover (fig. 2.5).
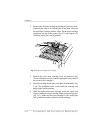
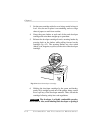
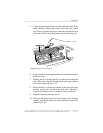
3. Pull up on the paper exit unit latch and then tilt the unit back
to open it (fig. 2.13).
4. Pull back the two latches (one on each side) of the separator
pawl unit to unlock it; then tilt the pawl unit back towards the
paper exit unit (fig. 2.14).
WARNING!
The fuser unit can become extremely hot and
cause severe burns. Make sure the unit is cool before handling
it.
ACHTUNG!
Die Fixiereinheit kann sehr heiß werden, so daß
Verbrennungsgefahr besteht. Bitte lassen Sie die Fixiereinheit
einige Zeit abkühlen, bevor Sie diese berühren.
Chapter 6
6-12 Consumables and Preventative Maintenance