


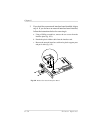
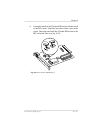
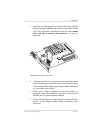

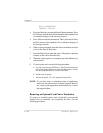

5. Hold the new disk vertically (connector-side down with the
bracket facing the SIMMs) and connect it to the ribbon cable
(fig. 8.26). Inspect the connection from all four sides to make
sure each pin is seated in the connector (no pins are
exposed).
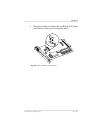
6. Align the new disk over its position on the board, then attach
it to the board by pressing firmly on the corners (not the center)
with one hand while steadying the board with the other hand
as you snap the disk in place.
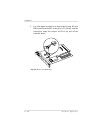
7. Make sure no other components on the board shifted or
loosened during the installation procedure, especially the
SIMMs and any optional interface boards.
8. Follow the instructions in “Replacing the Controller Board”
(earlier in this chapter), being careful to eliminate static
electricity.
Fig. 8.26 Install the New Hard Disk
Chapter 8
Printer Options 8-41