


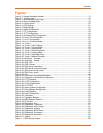


XPort AR User Guide 15
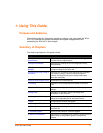
3: Using DeviceInstaller
This chapter covers the steps for viewing the XPort AR device server’s properties
and device details.
Accessing XPort AR using DeviceInstaller
Note: Make note of the MAC address. It is needed to locate the XPort AR
using DeviceInstaller.
Follow the instructions on the product CD to install and run DeviceInstaller.
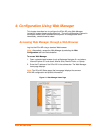
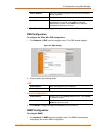
1. Click StartÆPrograms Æ LantronixÆDeviceInstallerÆDeviceInstaller.
2. Click on the XPort AR folder. The list of Lantronix XPort AR devices available
displays.
3. Expand the list of XPorts by clicking the + symbol next to the XPort AR icon.
Select the XPort AR unit by clicking on its IP address to view its configuration.
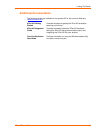
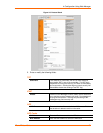
Viewing the XPort AR’s Current Configuration
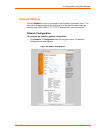
1. In the right window, click the Device Details tab. The current XPort AR
configuration displays:
Name Configurable field. Enter a name to identify the XPort AR.
Double-click on the field, type in the value, and press Enter to
complete. This name is not visible on other PCs or laptops
using DeviceInstaller.
Group Configurable field. Enter a group to categorize the XPort AR.
Double-click on the field, type in the value, and press Enter to
complete. This group name is not visible on other PCs or
laptops using DeviceInstaller.
Comments Configurable field. Enter comments for the XPort AR.
Double-click on the field, type in the value, and press Enter to
complete. This description or comment is not visible on other
PCs or laptops using DeviceInstaller.
Device Family
Non-configurable field. Displays the XPort AR’s device family
type as XPort AR.
Type Non-configurable field. Displays the device type as XPort AR.
ID
Non-configurable field. Displays the XPort AR’s ID embedded
within the box.
Hardware Address
Non-configurable field. Displays the XPort AR’s hardware (or
MAC) address.
Firmware Version
Non-configurable field. Displays the firmware currently
installed on the XPort AR.