


Step 2. When the prompt <F1> Setup is displayed, press F1. (This prompt is displayed on the screen for
only a few seconds. You must press F1 quickly.) If you have set both a power-on password and
an administrator password, you must type the administrator password to access the full Setup
utility menu.
Step 3. From the Setup utility main menu, select System Settings.
Step 4. On the next screen, select Integrated Management Module.
Step 5. On the next screen, select Network Conguration.
Step 6. Find the IP address and write it down.
Step 7. Exit from the Setup utility.
Logging on to the Web interface
To log on to the Web interface to use the remote presence functions, complete the following steps:
Step 1. Open a Web browser and in the address or URL eld, type the IP address or host name of the
IMM to which you want to connect.
Note: The IMM defaults to DHCP. If a DHCP host is not available, the IMM assigns a static IP
address of 192.168.70.125.
Step 2. On the Login page, type the user name and password. If you are using the IMM for the rst time,
you can obtain the user name and password from your system administrator. All login attempts are
documented in the event log.
Note: The IMM is set initially with a user name of USERID and password of PASSW0RD (passw0rd
with a zero, not a the letter O). You have read/write access. You must change the default password
the rst time you log on.
Step 3. On the Welcome page, type a timeout value (in minutes) in the eld that is provided. The IMM
will log you off of the Web interface if your browser is inactive for the number of minutes that
you entered for the timeout value.
Step 4. Click Continue to start the session. The System Health page provides a quick view of the system
status.
Enabling the Intel Gigabit Ethernet Utility program
The Intel Gigabit Ethernet Utility program is part of the server rmware. You can use it to congure the
network as a startable device, and you can customize where the network startup option appears in the
startup sequence. Enable and disable the Intel Gigabit Ethernet Utility program from the Setup utility.
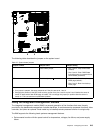
Conguring the Gigabit Ethernet controllers
The Ethernet controllers are integrated on the system board. They provide an interface for connecting
to a 10 Mbps, 100 Mbps, or 1 Gbps network and provide full-duplex (FDX) capability, which enables
simultaneous transmission and reception of data on the network. If the Ethernet ports in the server support
auto-negotiation, the controllers detect the data-transfer rate (10BASE-T, 100BASE-TX, or 1000BASE-T) and
duplex mode (full-duplex or half-duplex) of the network and automatically operate at that rate and mode.
You do not have to set any jumpers or congure the controllers. However, you must install a device driver to
enable the operating system to address the controllers. For device drivers and information about conguring
the Ethernet controllers, see the Intel Hartwell 82574L Gigabit Ethernet Software CD that comes with the
server. To nd updated information about conguring the controllers, complete the following steps.
218 Hardware Maintenance Manual