


10
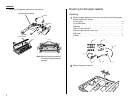
Installation
Initial setting
Clearing stored settings
Before initial setting, clear your machine’s built-in user data memory. This ensures
the memory will hold only your settings.
Important: After you done the initial setting, do not clear the memory again
unless an authorized technician asks you to do so.
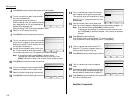
To clear the machine’s memory:
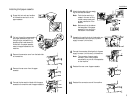
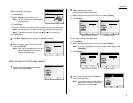
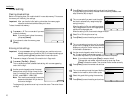
1
Press
MENU
,
*
,2.The
LCD
now asks if you want
to clear the memory.
Note: If you don’t want to clear the memory,
just press [Cancel].
2
If you do want to clear the memory, press
[Enter].
Entering initial settings
Important: If you press
RESET
during initial settings, your machine returns to
standby mode (its normal condition). But it will keep the settings you
saved by pressing [Enter] as described in these instructions.
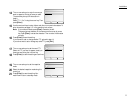
1
Press
FAX
to change to Fax mode, if the machine is in Copy mode.
2
Press
MENU
, [Fax Set],
I
, [Enter].
The
LCD
shows the current calendar/clock setting, with a cursor appearing
under the first digit.
3
Use the numeric keypad to enter the correct
date and time, using a 24-hour format for the
time. For instance, to set 1:30
PM
on November
26, 2001, press 2 0 0 1 1 1 2 6 1 3 3 0.
Note: Your machine automatically inserts the
spaces and date-slash. All you have to
do is enter the digits.
To change a digit, press the cursor key to move the cursor. Then enter the cor-
rect digit.
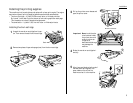
4
Press [Enter] to save the clock setting and continue the settings.
If you are setting up the North American version machine, proceed to next
step. Otherwise, skip to step 8.
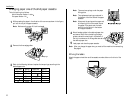
5
The
LCD
now asks if you want to set the calen-
dar/clock to automatically recognize daylight
saving time (
DST
).
When the setting is On, your machine automat-
ically recognizes
DST
at 2
AM
on the appropriate
switchover Sundays each year.
When the setting is Off, no automatic change will occur.
6
Select On or Off using the cursor key.
7
Press [Enter] to save the setting and continue.
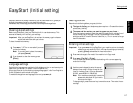
8
The
LCD
now asks you to enter your fax number
as you want it to appear on other fax machines’
displays or printouts. The fax industry term for
this number is Subscriber
ID
.
9
Use the numeric keypad to enter the fax num-
ber. To insert a dash, as shown here, press [ – ].
The number may contain up to 20 characters (numbers and dashes).
Note: If you make a mistake, press [Clear] to erase to the left.
To change just one number, move the cursor by cursor key. Press
[Clear] to erase the number. Then re-enter the fax number correctly.
10
Press [Enter] to save the number and continue.
11
The
LCD
now asks you to set the type of dialing
needed for the machine, either tone or pulse.
12
Select the type of dialing using the cursor key.
13
Press [Enter] to save the setting and continue.