


1.18
Getting started
4
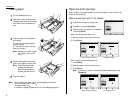
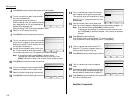
Press [Enter] to save the clock setting and continue EasyStart.
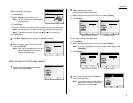
5
The
LCD
now asks if you want to set the calen-
dar/clock to automatically
recognize daylight saving time (
DST
).
When the setting is On, your machine automati-
cally recognizes
DST
at 2
AM
on the appropriate
switchover Sundays each year.
When the setting is Off, no automatic change will occur.
6
Select On or Off using the cursor key.
7
Press [Enter] to save the setting and continue.
8
The
LCD
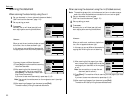
now asks you to enter your fax number
as you want it to appear on other fax machines’
displays or printouts. The fax industry term for
this number is Subscriber
ID
.
9
Use the numeric keypad to enter the fax num-
ber. To insert a dash, as shown here, press [ – ].
The number may contain up to 20 characters (numbers and dashes).
Note: If you make a mistake, press [Clear] to erase to the left.
To change just one number, move the cursor by cursor key. Press
[Clear] to erase the number. Then re-enter the fax number correctly.
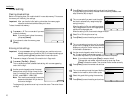
10
Press [Enter] to save the number and continue.
11
The
LCD
now asks you to set the type of dialing
needed for the machine, either tone or pulse.
12
Select the type of dialing using the cursor key.
13
Press [Enter] to save the setting and continue.
14
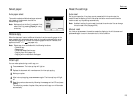
The
LCD
now asks you to enter the name you
want to appear at the top of faxes you send.
The name may be up to 22 characters in length.
Select TTI 1, 2 or 3 using the cursor key. Then
press [Enter].
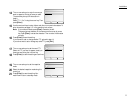
15
Use the one-touch keys to enter letters and
other non-numeric characters. Regarding entering characters, see page 1.15.
Note: If you make a mistake, press [Clear] to erase to the left.
To change just one character in the name, move the cursor by cursor
key. Press [Clear] to erase the character. Then re-enter the character
correctly.
16
Press [Enter] to save the setting.
If you do want to set or change another TTI, go back to step 14.
If you do not want to set or change any other TTI, press [Exit].
17
The
LCD
now asks you to set the usual TTI.
Select the TTI you want to appear usually on
faxes you send using the cursor key.
18
Press [Enter] to save the setting and continue.
19
The
LCD
now asks you to set the reception
mode.
20
Select desired reception mode using the cursor
key. (This setting can always be changed. We’ll
discuss reception modes further on pages 3.7.)
21
Press [Enter] to save the setting. Your machine
will return to standby mode.
EasyStart is complete!