


Advanced fax
18
To enter the
ITU
-
T
sub-address:
This is same procedure in step 9. Please refer to step 9.
19
To enter the
ITU
-
T
password:
This is same procedure in step 10. Please refer to step 10.
20
To set the Rx Protect:
Select “Rx Protect” using the cursor key, and then press [Enter].
Then, select desired setting “On” or “Off”.
On: Do not open this box to receive documents from callers.
Off: Open this box to receive documents from callers.
Press [Enter] to save the box’s name and continue.
21
To set the Auto Print:
Note: This setting is available only when the reception protection (Rx pro-
tect) setting is set to off (see step 20).
Select “Auto Print” using the cursor key, and then press [Enter].
Then, select desired setting “On” or “Off”.
On: Print the document automatically when the box receives it.
Off: Print the document manually, when you want to print it.
Press [Enter] to save the box’s name and continue.
22
To set the Overwrite Doc:
Note: This setting is available only when the reception protection (Rx pro-
tect) setting is set to off (see step 20).
Select “Overwrite Doc” using the cursor key, and then press [Enter].
Then, select desired setting “On” or “Off”.
On: When your machine receives a new document into this box, it will erase
any documents currently stored in it.
Off: When your machine receives a new document into this box, it will not
erase the documents stored in it. Your machine can store up to 30
documents (each document can include one or more pages) in each box.
Press [Enter] to save the box’s name and continue.
23
To set the Erase Tx Doc:
Select “Erase Tx Doc” using the cursor key, and then press [Enter].
Then, select desired setting “On” or “Off”.
On: Your machine erases the document from the box as soon as it sends it. If
you choose “On”, this box can be polled only once per document.
Off: Your machine does not erase a document from the box when it’s polled.
As long as your machine holds
AC
power and you do not erase the docu-
ment from the box, the document is available indefinitely for polling.
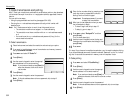
24
Press [Exit].
The machine asks for your F-Code box’s four-
digit security
I
.
D
. code. This is the
I
.
D
. code for
the box’s security, which you use to (1) print a
document any remote F-Code-compatible fax
sends to this F-Code box or (2) you enter before
you can make any changes to this F-Code box.
25
Decide on a four-digit
I
.
D
. code (0001-9999) for this F-Code box.
Write it down, and put it in a safe place.
Important: Do not use 0000 as an
I
.
D
. code.
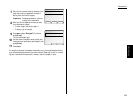
26
Use the numeric keypad to enter the four-digit
I
.
D
. code for this F-Code box.
Important: After completing this step, you must know this code to access
this F-Code box. Be sure to write it down.
27
Press
ENTER
to save the F-Code box information.
To create or modify another F-Code box, go back to step 3.
To finish, press
RESET
.
3.47
Fax Features Getting Started