


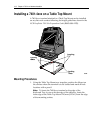

Chapter 4: 7401-4xxx Hardware Installation 4-19
2. Drill pilot holes or through holes for the mounting screws (4) or
mounting bolts. Screws or bolts used for mounting the terminal are
not provided with the mount and must be purchased locally. The
holes in the mount are xx mm (xx in.) in diameter.
3. Drill the hole to route the cables out the bottom of the terminal, if
using that cable routing solution.
4. Secure the Table Top Mount to the mounting surface.
Note: When the front edge of the Table Top Mount is located away
from the edge of the mounting surface, it may be necessary to
remove the Motorized Card Reader, Keyboard, and Sliding Drawer
assembly before placing the terminal onto the mount to provide access
to the mounting screws. Refer to the “Accessing the Mounting
Screws” section below for details.
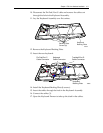
5. Lower the terminal onto the Mount aligning the locking pins (4) on
the bottom of the terminal with the slots in the mount.
Caution: Use care when lifting the terminal. The 7401-4xxx
terminal weighs approximately 90 lbs. (40.8 kg).
6. Push the terminal to the back until the locating pins (2) in the back
of terminal are fully engaged into the holes in the mount.
7. Secure the terminal to the mount using the 8x32 screws (2).
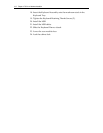
Accessing the Mounting Screws
The following steps describe how to remove the Motorized Card
Reader, Keyboard, and Sliding Drawer assembly to provide access the
mounting screws.
1. Unlock the cabinet lock and raise the core module door to open the
cabinet.
2. Slide the Keyboard Tray forward until it stops.
3. Remove the Motorized Card Reader (if present) as described in the
“Removing the Motorized Card Reader” section in Chapter 4 of the
NCR EasyPoint 7401 Hardware Service Guide (B005-0000-1341).