


Model 3610 Installation
2-153610-A2-GB41-60 March 1999
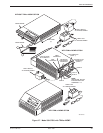
Removing the DSU from Its Base
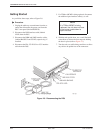
Refer to Figure 2-4 as you follow these steps. If
replacing a TDM or MCMP, refer to this figure as you
remove the current TDM or MCMP.
" Procedure
1. Disconnect the keypad flat cable from the DSU by
squeezing the small black latches on each side of
the cable and carefully lifting the cable up and out
of the connection.
2. Disconnect the LCD flat cable from the DSU
circuit card. Gently work the cable (not the
connector) out from the connector. Be careful not
to bend any of the cable pins.
3. If a TDM or MCMP, is being replaced, disconnect
the TDM or MCMP flat cable’s pre-folded
40-position header from the DSU, and fold the
TDM or MCMP flat cable out over the side of the
expanded base. Remove the two thread-cutting
screws at the front corners and the screw with
captive-lock washer at the rear corner of the DSU.
4. Remove the DSU from the existing base.
Carefully lift the DSU up until its connectors are
free of the rear panel. Set the DSU on a clean ESD
(anti-static) workpad.
5. Write the serial number from the existing base
onto the new TDM or MCMP expanded base
using indelible ink (see Figure 2-3). Discard the
existing base and rear panel.
Installing a TDM/Flex
or MCMP/Flex
To change the Flex interface S1 switch, refer to the
Changing the Flex Interface Switch section of this chapter.
To complete the TDM/Flex or MCMP/Flex installation,
refer to Figure 2-4 while following this procedure.
" Procedure
1. Fold the TDM or MCMP flat cable out over the
side of the new expanded base.
2. Position the DSU over the new expanded base.
3. Secure the DSU to the expanded base using the
two #4 thread-cutting screws at the front corners,
and the #4 screw with captive-lock washer at the
rear corner (make sure this screw is tightened).
4. Connect the TDM or MCMP flat cable’s
pre-folded 40-position header to the DSU. Make
sure the pins are correctly aligned with the
connector (one pin hole on the connector is
blocked).
5. Reconnect the keypad flat cable by inserting the
cable into its connector as far as it will go. Then,
push down on the tiny latching mechanism.
6. Being careful not to bend the pins, align the LCD
flat cable to its connector. Then gently push the
cable pins back into place.