


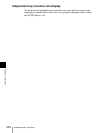


Chapter 3 Transitions
256
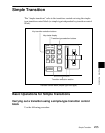
Simple Transition
1
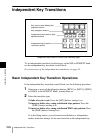
With the background A row of cross-point buttons in the cross-point
control block, select the background video.
2
Using one of the following methods, select the way in which the transition
will affect the image.
Use a combination of the transition type selection buttons ([MIX], [NAM],
[WIPE] and [DME]) and the next transition selection buttons ([KEY1] and
[KEY2]).
For an overview of the mix, NAM, wipe, and DME wipe transition types,
see “Transition Types” (page 39).
To change the background only: Press one of the [MIX], [NAM],
[WIPE], and [DME] buttons.
The [KEY1] and [KEY2]buttons go off, and the system changes to the
background transition mode.
To insert or delete key 1: Hold down the [KEY1] button and press one of
the [MIX], [NAM], [WIPE], and [DME] buttons.
To insert or delete key 2: Hold down the [KEY2] button and press one of
the [MIX], [NAM], [WIPE], and [DME] buttons.
To insert or delete key 1 and key 2 simultaneously: Hold down the
[KEY1] and [KEY2] buttons, and press one of the [MIX], [NAM],
[WIPE], and [DME] buttons.
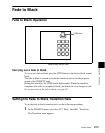
To use a super mix or preset color mix: Select [Super Mix] or [Preset
Color Mix] in the Misc>Transition menu for the M/E or PGM/PST
bank.
To set the key priority, use the Misc>Key Priority menu for the M/E or
PGM/PST bank. For details, see “Setting the Key Priority by a Menu
Operation” (page 229).
3
Select the new background for after the transition.
• Select the background video with the background B row of cross-point
buttons.
• To insert a key, select the key signal, and make various settings as
required.
For details of key settings, see Chapter 4 “Keys” (page 261).
4
Depending on the transition type selected in step 2, make the required
settings.
For details of the settings, see the following sections:
Super mix: “Super Mix Settings” (page 233)
Preset color mix: “Color Matte Settings” (page 234)
Wipe: “Basic Procedure for Wipe Settings” (page 304)
DME Wipe: “Basic Procedure for DME Wipe Settings” (page 332)