Chapter 2 Powering On and Configuring BIOS Settings 2-31
2.5 Using the Force-Recovery Jumper P5
You can use this jumper to force the server to flash a new BIOS, in the case of a
system hang. For example, if the system hangs after an ILOM SP firmware/BIOS
update, use this procedure to force the server to look for the new BIOS.
1. Shut down the server to standby power mode by using a ballpoint pen or other
stylus to press and release the recessed Power button on the front panel. See
Section 2.2, “Powering Off the Server” on page 2-3.
2. Disconnect the AC power cords from the server.
Caution – Before handling components, attach an ESD wrist strap to the grounding
post that is built into the rear of the chassis (see
FIGURE 1-2 or FIGURE 1-5 for the
location). The system’s printed circuit boards and hard disk drives contain
components that are extremely sensitive to static electricity.
3. If the server is in a rack, slide it far enough from the rack so that you can remove
the main cover. If you cannot safely view and access the motherboard, remove the
server from the rack.
4. Remove the main cover from the server.
See Section 3.2.2, “Removing the Main Cover” on page 3-3 or Section 4.2.2, “Removing
the Main Cover” on page 4-3.
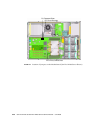
5. Install the shorting jumper across the P5 header pins.
See
FIGURE 2-4 for the P5 jumper location. The P5 jumper’s function is to instruct the
system to force recovery of the latest BIOS at system reboot.
6. Reinstall the main cover to the server.
7. Reconnect AC power cords to the server.
The server powers up to standby power mode, indicated when the Power/OK LED
on the front panel is flashing.
8. Return the server to main power mode by using a ballpoint pen or other stylus to
press and release the recessed Power button on the front panel.
You must fully power on the server to complete the reset. This is because the state of
the P5 jumper cannot be determined without the host CPU running.
9. Repeat steps 1 through 8 to remove the P5 jumper. (Remove the jumper in step 5
rather than inserting it.)


