


138
5. Press FUNCTION and then press RESET.
6. The copier should take about 5 minutes to reboot.
7. After reboot is complete, press ON/OFF in the Touch Panel and then press ON LINE.
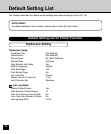
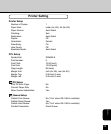
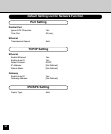
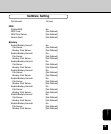
• The copier automatically prints out the PrintMe Activation Page and the GA-1140 Setting List. The
PrintMe Activation Page contains a 16-digit activation code which is required to proceed with PrintMe
Setup. It may take a few minutes for the PrintMe Activation Page to print.
NOTE: It is highly recommended that you enter your PrintMe activation code on www.printme.com
within an hour from the time it is printed. Your activation code may become invalid if you try to enter
your code after this time lapses. If this happens, you must disable PrintMe in Setup, allow the GA-1140
to restart and go through PrintMe Setup again to get a valid activation code. For information on how to
enter your PrintMe activation code on www.printme.com, see following instruction; “Activating PrintMe
Services”.
NOTE:
The GA-1140 version 1.0 does not support PrintMe Proxy Setup. Disregard PrintMe Proxy
Setup options and do not specify any of these settings.
Activating PrintMe Services
After the copier is enabled for PrintMe, it must be placed on the PrintMe network and assigned with a
Service Plan. For this, you must have a web-enabled computer to access www.printme.com.
Activating PrintMe Services
1. Logon to www.printme.com.
2. Click Activate Station to setup a new account.
• Existing PrintMe account holders who want to activate a new printer can simply login to their accounts
and click the Setup Printer tab.
3. Enter the 16-digit PrintMe activation code.
• The PrintMe activation code is located on the PrintMe Activation Page. This page was automatically
printed after you completed setup. See “PrintMe Setup Options”.
• The activation code also appears on the GA-1140 Setting List.