


Network configuration Adding routes in Transparent mode
FortiGate-100 Installation and Configuration Guide 117
6 Set Device #1 to the FortiGate interface through which to route traffic to connect to
Gateway #1.
You can select the name of an interface or Auto (the default). If you select the name of
an interface, the traffic is routed to that interface. If you select Auto the system selects
the interface according to the following rules:
• If the Gateway #1 IP address is on the same subnet as a FortiGate interface, the
system sends the traffic to that interface.
• If the Gateway #1 IP address is not on the same subnet as a FortiGate interface,
the system routes the traffic to the external interface, using the default route.
You can use Device #1 to send packets to an interface that is on a different subnet
than the destination IP address of the packets without routing them using the default
route.
7 Set Device #2 to the FortiGate interface through which to route traffic to connect to
Gateway #2.
You can select the name of an interface or Auto (the default). If you select the name of
an interface, the traffic is routed to that interface. If you select Auto the system selects
the interface according to rules:
• If the Gateway #2 IP address is on the same subnet as a FortiGate interface, the
system sends the traffic to that interface.
• If the Gateway #2 IP address is not on the same subnet as a FortiGate interface,
the system routes the traffic to the external interface, using the default route.
You can use Device #2 to send packets to an interface that is on a different subnet
than the destination IP address of the packets without routing them using the default
route.
8 Select OK to save the route.
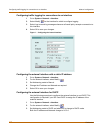
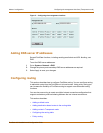
Adding routes in Transparent mode
Use the following procedure to add routes when operating the FortiGate unit in
Transparent mode.
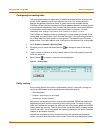
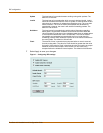
1 Go to System > Network > Routing.
2 Select New to add a new route.
3 Enter the Destination IP address and Netmask for the route.
4 Enter the Gateway IP address for the route.
5 Select OK to save the new route.
6 Repeat these steps to add more routes as required.
Note: Any 2 routes in the routing table must differ by something other than just the gateway to
be simultaneously active. If two routes added to the routing table are identical except for their
gateway IP addresses, only the route closer to the top of the routing table can be active.
Note: Arrange routes in the routing table from more specific to more general. To arrange routes
in the routing table, see “Configuring the routing table”.