


7-12
Windows 2000 Configuration
Setting Up LPR Printing
If the printer driver has not already been installed, please install it before
continuing. Instructions for installing the printer are found in Chapter 4 of this
manual, Using the Elite 21 with Windows 2000. Install the printer as if it were a
local printer connected to the parallel (LPT1) port. The following instructions
will cover setting up the Windows 2000 server to direct output to the printer as
an LPR device.
Please note: In the following instructions, some field or dialog names may vary
depending on the Win2000 release pack in use.
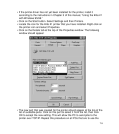
• Click on the Start Button. Select Settings and then Printers.
• Locate the icon for the Elite 21 printer that you have installed. Right-click on
the printer icon and select Properties.
• Click on the Ports tab and click on Add Port.
• Click on “New Port” and select “Standard TCP/IP Port” from the list of
options.
• This will open the Add TCP/IP Port Wizard. Click Next at the introduction
page of the Wizard.
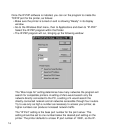
• The next window asks for a Printer Name/IP Address and Port Name. Type
in the IP Address that you entered into the printer. If the printer does not
have an IP address, please follow the instructions at the beginning of this
section under Assigning an IP Address to assign one. The Port Name will
be filled in automatically, but can be changed if desired. Click Next.
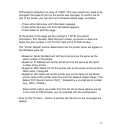
• The Device Type window appears. Click on the Standard radio button and
select “Generic Network Card” from the list. Click Next.
• A summary page will appear showing all the settings that were made within
the Add TCP/IP Port Wizard. Double-check these settings and click Finish.
• The Ports window will re-appear, with the newly created TCP/IP port
displayed and selected (listed by its Port Name as entered in the TCP/IP
Port Wizard).
• Make sure the new port is highlighted, then click on “Configure Port.”
• Under “Protocol,” click on the “LPR” radio button.
• Under “Queue Name,” fill in a name for the print queue.
• Click OK and Apply to accept the changes to the port.