


7-24
field and click on the Create button.
3 Create Print Queue Object
• Once again, highlight the Organizational Unit, select the Object item from
the menu and choose Create.
• At the New Object window, scroll down the Class of New Object icon list,
select the Print Queue icon, and click on the OK button.
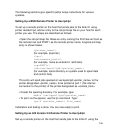
• At the Create Print Queue screen, click on the Directory Service Queue
button, then type in values for Print Queue Name and Print Queue
Volume and click on the Create button. If you don't know the Print Queue
Volume name (the hard drive you will be accessing), click on the icon to
the right of the volume field. The Select Object window will appear with
the volume listed in Objects. If the volume is not listed, scroll the
Directory Context items until you find the volume where you want the
queue to reside.
• Click on the object (hard drive) of your choice and it will appear in the
Selected Object: field. Click on the OK button. The full volume will now
appear in the Print Queue Volume field. Finally, click on the Create
button.
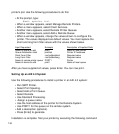
4. Assign Printer Object
• Go to the Directory Tree. Double click on the printer object just created
and bring up the Printer window. See below. Find the Assignments button
on the right-side of the window and click on the Add button.
• When the Select Object window appears, find the print queue object just
created among the choices listed in the Objects box and select it.
• Click on the OK button and the print queue just created is added to the
Print Queues: box in the Printer: window. Click on the OK button again.
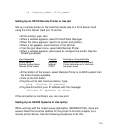
5. Assign Print Server Object
• At the Directory Tree, double click on the print server object you just
created and bring up the Print Server window.
• At the Print Server: window, click on the Assignments button and Add
button to bring up the Select Object window. Select the printer object just
created from the Objects: box and click on the OK button. Now the printer
(with its context) appears in the Printers: box of the Print Server window.
Click on the OK button.