


92 Troubleshooting and maintaining Back to TOC
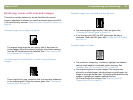
The image is completely black or completely white.
The item might not be placed correctly on the scanner glass or in
the ADF. Make sure that the item you are trying to scan is placed
face down on the glass, or face up in the ADF.
Colors in the scanned image are different from the original item.
Scanners, monitors, printers, and different operating systems
interpret color differently. Use the hue and saturation settings in the
HP Precisionscan Pro software to adjust the colors.
In the HP Precisionscan Pro software, all of the image scanned when
I only wanted part, or vice versa.
The selection area might not be selected correctly. Make sure the
selection border is surrounding the area you want in the final scan.
Scanned images are crooked.
The item might have been placed crookedly or shifted when you
closed the lid. Straighten the original on the scanner glass and
scan again.
I thought I made the image smaller or larger before the final scan in
the HP Precisionscan Pro software, but it is still the same size as the
original.
You might have zoomed in or out, which does not change the size
of the image. Change the output size. See "Resizing (output
dimensions)" on page 45.
An original photo was fuzzy, and the scanned image looks even
worse.
The sharpening level needs to be increased. In the
HP Precisionscan Pro software, adjust the sharpening. See
"Sharpening an image" on page 48.
Scanned images are grainy, jagged, or fuzzy.
You resized the image in a program other than the
HP Precisionscan Pro software. Resize the image in the
HP Precisionscan Pro software before you send it to the other
program. (See "Resizing (output dimensions)" on page 45.) Or,
if the original was a black and white drawing, use the Black &
White Scalable output type for the scanned image. (See
"Selecting output type" on page 43.)
In the HP Precisionscan Pro software, the resolution is set too
low. Set the resolution to a higher number, or return to the
default setting. See "Changing resolution" on page 46.
In the HP Precisionscan Pro software, too much or too little
sharpening was applied. Adjust the sharpening. See
"Sharpening an image" on page 48.
An original photo had marks, flaws, or scratches, and the scanned
image looks even worse in the HP Precisionscan Pro software.
You sharpened the image manually. Return to the default
setting. See "Sharpening an image" on page 48.
Best Quality Sharpening is selected. Check the setting. See
"Setting preferences" on page 68.
I set the image to a higher resolution in the HP Precisionscan Pro
software, but the output quality is no better.
Setting the resolution to a higher number does not necessarily
improve quality. The software sets the resolution automatically
based on the type of item you scanned. Keep or return to the
default. See "Changing resolution" on page 46 or "Tips for best
image quality" on page 67 for guidelines.
If you sent the image to another program, the program might not
support the resolution you set in the HP Precisionscan Pro
software. Determine the setting the program uses and set the
resolution in the HP Precisionscan Pro software to that
resolution.