


3. Touch or to scroll through the thumbnails of your photos.
4. When the thumbnail of the photo you want to edit appears, touch it.
5. When the selected photo appears by itself on the display, touch the image or touch
Options.
The Options menu appears.
6. Touch Edit.
The Edit menu appears.
7. Touch Color Effect.
NOTE: If the menu option you want is not visible on the screen, touch or
to scroll through all the menu options.
The Color Effect menu appears.
8. Touch one of the color effect options:
No Effect Does not apply any special color effects to your photo.
Black & White Prints the photo in black and white.
Sepia Applies brown tones, similar to photos produced in the early 1900s, to
your photo.
Antique Applies brown tones along with some pale colors to your photo. With
this option, your photo will look like it was hand-tinted.
The selected color effect is applied to the photo, and the photo is shown by itself on
the display.
To preview your edited photo
▲ Touch the Back icon until you return to the Options menu, then touch Print
Preview.
To print your edited photo
▲ Touch the Back icon until you return to the View Photos screen, then touch
Print.
Remove red-eye
The flash on a camera (especially on older model cameras) can sometimes cause a
subject's eyes to appear red in your photos. You can remove redness so that eyes appear
the correct shade in your photos.
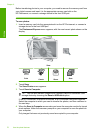
To remove red-eye from photos
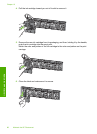
1. Insert a memory card into the appropriate slot on the HP Photosmart, or connect a
storage device to the front USB port.
The Photosmart Express menu appears, with the most recent photo shown on the
display.
2. Touch View.
The View Photos screen appears.
3. Touch
or to scroll through the thumbnails of your photos.
Edit photos using the control panel 81
Photos