


1-25
Setting Up the Analyzer
To Back Up and Restore Files
1 Setting Up the
Analyzer
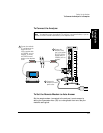
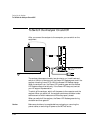
To Back Up Files from the Analyzer to an HP-UX
Workstation
1 On the networked HP-UX workstation, NFS mount the analyzer file
system under the local workstation file system, using the following
command:
/etc/mount <E5200A IP address>:/IDE /<mount point>
2 Copy all files and directories under /<mount point>/ to your
workstation file system or a backup device.
To Restore Files
If any data is damaged or lost from the analyzer’s hard disk, you should
restore the latest version of the files that you have backed up.
To Restore Files from Backup Storage Media to a
Notebook PC
If the notebook PC boots, restore the files using the Microsoft Restore
Utility in the Microsoft Utilities program group. See the Microsoft
Windows (Ver. 3.1) User’s Guide.
If the Notebook PC Does Not Boot
1 Press F2 then F8.
2 Set the Boot From parameter to FDD. This allows the notebook PC to
boot from drive A.
3 Press F3 and insert the bootable diskette (see “To Create a Bootable
Diskette” on page 1-23) in drive A.
4 Switch the notebook PC off and then on again so that it can boot from
drive A.