


8. Programmable Features
80
Code #77: Changing the receiving mode in
the AUTO ANSWER setting
AUTO ANSWER
MODE=TAM/FAX [±]
“TAM/FAX” (default): Telephone Answering
Machine/Fax mode (page 58)
“FAX ONLY”: Fax only mode (page 59)
Code #80: Resetting advanced features to
their default settings
SET DEFAULT
RESET=NO [±]
To reset the advanced features:
1. Press {MENU}.
2. Press {#}, then {8}{0}.
3. Press {A} or {B} repeatedly to select “YES”.
4. Press {SET}.
5. Press {SET} again.
6. Press {MENU}.
8.4 Direct commands for
base unit programming
features
You can also select the desired setting by directly
entering the program code (# and a 2-digit
number) and direct command.
For more details on the features, see page 75 to
page 80.
1 Press {MENU}.
2 Press {#} and the 2-digit code number.
3 Press the desired direct command to display
the desired setting.
L This step may be slightly different
depending on the feature.
4 Press {SET}.
5 To exit programming, press {MENU}.
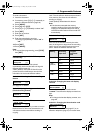
8.4.1 Program code and direct
command button
{#}{0}{0} Quick Setup
– {1}: “TAM/FAX” (default)
– {2}: “DIST. RING”
– {3}: “TEL ONLY”
– {4}: “FAX ONLY”
L Press {SET} 2 times before pressing the
direct command button.
{#}{0}{1} Date and time
L Enter the date and time using the dial
keypad. See page 31 for details.
{#}{0}{2} Your logo
L Enter your logo using the dial keypad. See
page 32 for details.
{#}{0}{3} Your fax number
L Enter your fax number using the dial keypad.
See page 34 for details.
{#}{0}{4} Sending report
– {1}: “ON”
– {2}: “OFF”
– {3}: “ERROR” (default)
{#}{0}{6} FAX ring count
– {1}: “1”
– {2}: “2”
– {3}: “3” (default)
– {4}: “4”
FPG391_en.book Page 80 Friday, July 16, 2004 5:38 PM