980541-001 Rev. A P640i Card Printer User Guide 65
Printer Properties
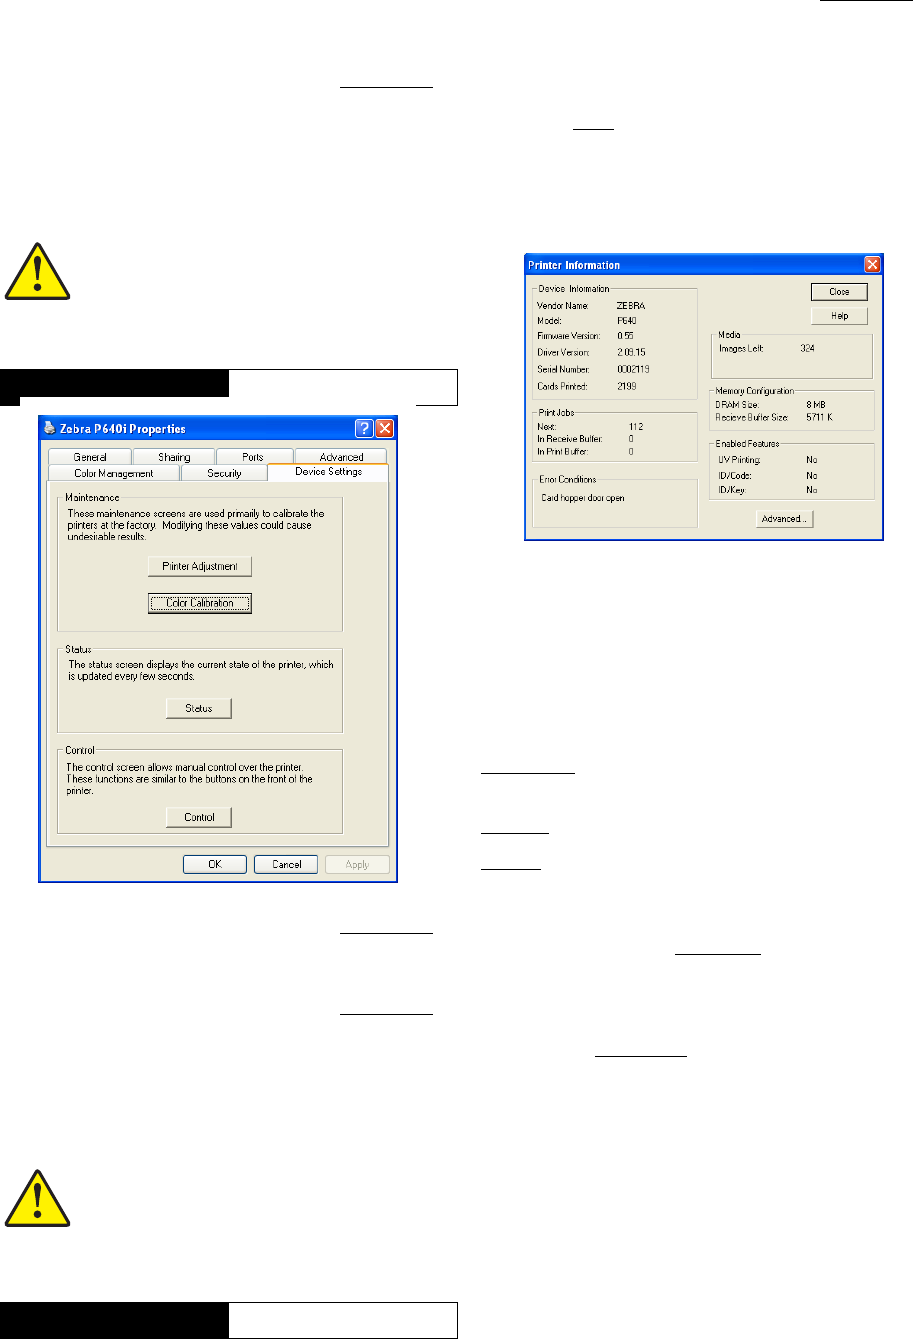
Navigate to Properties by following this sequence:
Start > Printers (or Printers and Faxes) > Right click
Zebra P640i > Properties
Most of the tabs on the Properties screen (General,
Sharing, etc.) are of the “set and forget” variety, page
TN8-8. We start here with
Device Settings, the location
for all driver-controlled adjustments and displays.
Start > Printers (or Printers and Faxes) > Right click
Zebra P640i > Properties > Device Settings > Status
Print Jobs
The number of the print job that is currently being
processed. Next
is meaningful only when the printer is
not being driven by a PC. If the printer is being driven
by a PC, the PC sets the job number to be the same as
the PC-assigned spooler job number before sending to
the printer.
Error Conditions: Normally, this displays “No
Error”.
Images Left: The exact number of YMCK sets
remaining on the color ribbon, as reported by the color
ribbon core.
Enabled Features:
Uv Printing is enabled in manufacture, or by field
technician.
ID/Code
(the user password) is enabled by the user.
ID/Key
requires installation of a physical key. This
displays “Yes” once the printer has locked itself to the
key, not just because it has the key installed.
Advanced: Click the Advanced button to display
Sensor Data, below.
(Another way to display this screen is through this
sequence, see page TN8-5:
Start > Printers (or Printers
and Faxes) > Right click Zebra P640i > Properties >
Device Settings > Control > Advanced Utilities > Show
Sensor Data)
Caution • Some of the sub menus under
Device Settings are specific to the Print
station, Mag encoder, and Laminator.
Refer to the relevant Tech Notes section.
Device Settings
Status
Caution • Some of the sub menus under
Device Settings are specific to the Print
station, Mag encoder, and Laminator.
Refer to the relevant Tech Notes section.
Device Settings
Status
