


24 CHAPTER 2: INSTALLING THE 3C359B NIC
5 Reduce any static electricity on your body.
Each NIC is packed in an antistatic container to protect it
during shipment. To avoid damaging any static-sensitive
components after removal from the container, be sure to
reduce any static electricity on your body.
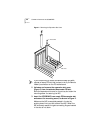
One way to reduce static electricity is to touch an
unpainted part of the computer’s metal chassis. You can
maintain grounding by wearing an antistatic wrist strap
attached to the chassis.
6 Verify that your tools are nonconducting or insulated.
Your tools should include a flat-head screwdriver and a
Phillips-head screwdriver. To avoid permanent damage to
the NIC or other computer circuitry, use only insulated or
nonconducting tools.
Unpacking and Inspecting the 3C359B NIC
Before you install the 3C359B NIC, make sure that you
have the following items:
■ TokenLink Velocity XL PCI 3C359B NIC
■ TokenDisk diskettes 1 and 2
■ TokenLink Velocity XL CD
■ Remote Wake-Up cable (optional; install this cable only
if your PC supports Remote Wake-Up and you want to
use this feature)
■ TokenLink Velocity XL PCI Network Interface Card User
Guide and Quick Guide
If any of these items are damaged or missing, contact your
shipper or network supplier.
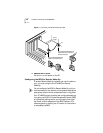
1 Unpack the 3C359B NIC and remove it from its
antistatic container.
2 Lay the NIC on its antistatic container.
3 Inspect the NIC for visible signs of damage.
If you find damage, immediately notify your authorized
network supplier and the carrier that delivered the NIC.
Retain the original packing materials. If it is necessary to
return the 3C359B NIC to 3Com, pack it in the original (or
equivalent) packing material to maintain the warranty.