


260 Brocade MLX Series and NetIron XMR Hardware Installation Guide
53-1002373-02
Installing a Brocade NetIron XMR 8000 router
4
Connecting DC power
You can supply DC power to your router using a DC-to-DC power supply. DC power must be supplied
at 48 V and 40A for 1200W power supplies and 48 V and 60A for 1800W power supplies. The
1200 W DC-to-DC supply provides the DC power to the router at 12 V and 100 A. The 1800W
DC-to-DC supply provides the DC power to the router at 12 V and 150 A.
DANGER
The procedure in this section is for qualified service personnel.
Follow these steps to connect a DC power source.
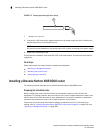
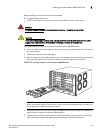
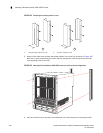
1. Use a #1 Phillips screwdriver to remove the two screws that hold the transparent cover
over the power supply lugs, as shown in Figure 182.
2. Remove the transparent cover.
FIGURE 182 The Brocade NetIron XMR 8000 DC power supply
3. Use a #2 Phillips screwdriver to remove the power lugs, as shown in Figure 182.
4. Crimp the correct AWG power supply wire into the power lugs and reconnect the lugs to the
power supply:
For a 1200 W power supply, crimp #8 AWG
For a 1800 W power supply, crimp #6 AWG
CAUTION
For the NEBS-compliant installation of a Brocade NetIron XMR 4000, 8000, and 16000 routers
with AC and DC system use a ground wire of at least 6 American Wire Gauge (AWG). The ground
wire should have an agency-approved crimped connector (provided with the router) attached to
one end, with the other end attached to building ground. The connector must be crimped with the
proper tool, allowing it to be connected to both ground screws on the enclosure. Before crimping
the ground wire into the provided ground lug, insure the bare copper wire has been cleaned and
antioxidant is applied to the bare wire.
1 Screws holding transparent cover 2 Screws holding power lugs
DC OUT
ALM
DC IN
1
2