


Brocade MLX Series and Brocade NetIron XMR Hardware Installation Guide 353
53-1002373-02
Replacing a fiber-optic transceiver
8
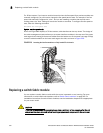
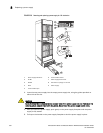
For a graceful shutdown of the links, it is recommended that you disable the switch fabric module
before removing it from the device. It is also recommended that you remove or replace switch
fabric modules one at a time. If you need to remove all of the switch fabric modules at the same
time, you must shut down the router and remove the power source.
Replacing a fiber-optic transceiver
You can replace a fiber-optic transceiver in a 10 Gigabit Ethernet port while the device is powered
on and running.
DANGER
All fiber optics interfaces use Class 1 lasers.
DANGER
Laser Radiation. Do Not View Directly with Optical Instruments. Class 1M Laser Products
Before removing a fiber-optic transceiver, have the following items available:
• The protective covering that you removed from the fiber-optic transceiver port when you initially
installed the module
• An ESD wrist strap with a plug for connection to the ESD connector on the router chassis.
DANGER
For safety reasons, the ESD wrist strap should contain a 1 megohm series resistor.
To replace a fiber-optic transceiver in a 10 Gbps Ethernet port, perform the following steps:
1. Put on the ESD wrist strap and ground yourself by inserting the plug into the ESD connector
located on the front of the router.
2. Disconnect the two fiber cable connectors from the port connectors.
3. Replace the protective cover on the port connectors.
4. Pull down the latch on the front of the transceiver.
5. Pull the transceiver out of the port and place it in an anti-static bag for storage.
6. Remove the new transceiver from the protective packaging.
7. Insert the fiber-optic transceiver into the port until it clicks into place. Fiber-optic transceivers
are keyed to prevent incorrect insertion.