


276 Brocade MLX Series and NetIron XMR Hardware Installation Guide
53-1002373-02
Installing a Brocade NetIron XMR 32000 router
4
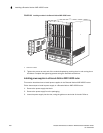
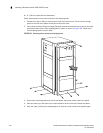
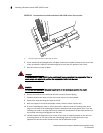
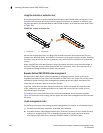
FIGURE 192 L-brackets that secure the Brocade NetIron XMR 32000 router to the inner pallet
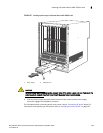
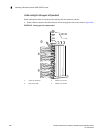
4. Use a mechanical lift equipped with a lift plate. Position the lift plate as close to the front of the
router as possible. Adjust the lift plate height to be even with the bottom of the router.
5. Slide the router onto the lift plate.
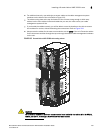
DANGER
A Brocade NetIron XMR 32000 router is extremely heavy, even when it is unpopulated. Four or
more people are required to position the unpopulated router into the rack.
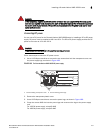
DANGER
Do not use the handles on the power supply units or fan modules to position the router.
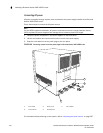
6. Secure the router to the mechanical lift with a strap to prevent tipping.
7. Carefully position the router in front of the rack where it is to be installed.
8. Remove the strap securing the router to the lift.
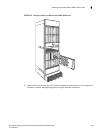
9. With two people in front and two people in back, slide the router into the rack.
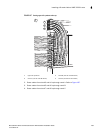
10. If you are installing the router in a four-post rack or cabinet, install a mounting screw and a
cage nut into each of the holes aligned with the threaded holes in the spacer bars. If you are
installing the router in an open-frame rack, install four standard #12-24 pan-head screws into
the keyhole mounting holes aligned with the rack.
11. Visually inspect the alignment of the router. If the router is installed properly in the rack, the
mounting screws on one side of the rack should align with the mounting screws on the
opposite side and the router should be level. Add all additional screws.
1 L-brackets (two brackets on either side of router)
1