


3-46
Confidential
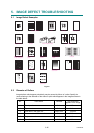
5.3 Troubleshooting Image Defect
Image defect related problems are end user recoverable if following the User Check items. If
the same problem occurs, follow each procedure in the order of the number described in the
Step column in the tables below.
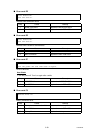
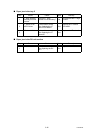
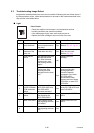
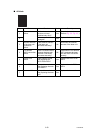
■ Light
<User Check>
- Check the machine's environment. Low temperature and low
humidity conditions can cause this problem.
- If the whole page is light, toner save mode may be on.
- Replace the toner cartridge or drum unit with a new one.
Step Cause Check
Result
Remedy
1
Dirt on exposure
drum electrode
Are the electrodes of the
drum unit and machine
body dirty?
Yes
Clean both electrodes.
(Refer to Fig. 3-2, Fig. 3-3.)
2
Dirt on scanner
windows of the
laser unit
Is the scanner windows
of the laser unit dirty? Yes
Wipe the dirt off with a soft,
clean, lint free cloth.
(Refer to Fig. 3-6.)
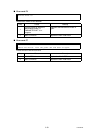
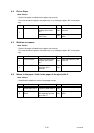
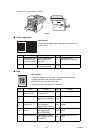
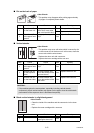
3
Toner sensor
failure
After replacing the toner
cartridge with a new
one, does the same
problem occur even
after printing several
pages?
No
Replace the toner
cartridge.
4
Does the machine start
printing even after
removing the toner
cartridge from the drum
unit?
Yes
Clean the toner sensor.
(receiving light side /
emitting light side)
Check the harness
connection of the toner
LED PCB ASSY.
(luminescence side)
Replace the toner sensor
PCB ASSY or toner LED
PCB ASSY.
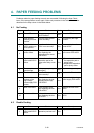
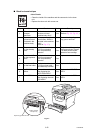
5
Between the
HVPS PCB/Main
PCB connection
failure
Is the harness of the
HVPS PCB ASSY and
main PCB ASSY
connected correctly?
Yes
Reconnect the harness of
the HVPS PCB ASSY and
main PCB ASSY.
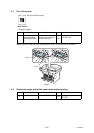
6
HVPS PCB
failure
Is the problem solved
after replacing the
HVPS PCB ASSY?
Yes
Replace the HVPS PCB
ASSY.
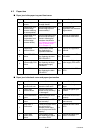
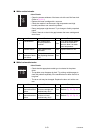
7
Main PCB failure Is the problem solved
after replacing the main
PCB ASSY?
Yes
Replace the main PCB
ASSY.
8
Laser unit failure Is the problem solved
after replacing the laser
unit?
Yes
Replace the laser unit.