


Storing recordings
Cisco TelePresence Content Server 4.1 printable online
Page 38 of 121
Storing recordings
The default location for media files is drive E:. You can change this to store files on a Network
Attached Storage device (NAS), so that the recording capacity is not limited by the disk space on the
Content Server. Then media will be recorded to a temporary directory on the Content Server before
automatically being moved to the NAS. The Content Server streams the media from the NAS.
Cisco recommends using a NAS device built on the Windows Storage server that is also Windows
Hardware Quality Lab certified. The file sharing protocol used by the Content Server to the NAS is
Microsoft SMB.
Notes: For best performance, Cisco recommends that the NAS used is a device dedicated to media
storage. Running applications such as domain controllers, databases or external streaming servers
on the same device may result in errors.
The Content Server must be added to the same domain as the NAS.
Changing the storage location to use Network Attached
Storage
Ensure you have enough time to complete the operation. The TCS Wizard copies all media files
referenced by the Content Server database from the local E: drive to the external storage location.
This takes several minutes, depending on how much media is recorded.
To change the media storage location from the default E: drive to a NAS
WARNING: Using the wizard to move media from the local E: drive to the external storage location
does not move any media files which are not associated with the Content Server’s database. That
includes orphaned temporary files not used in any conferences, .tcb
import or export files, and files
placed in the data folder by users. These files will not be moved and will be deleted. However when
you use the TCS Wizard to move media between one NAS location and another, or from the NAS
back to a local Content Server disk drive, these files will not be moved, and the TCS Wizard will not
delete them from the NAS.
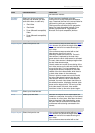
1. Back up the Content Server.
2. Add the Content Server to the same domain as the NAS. If you add the Content Server to an
existing domain, you need to define a separate security policy for the Content Server, otherwise
the existing security policies may prevent the server from functioning correctly. Please contact
your authorized Cisco reseller for details of the recommended security policy settings.
3. Choose or create an account in the domain that IIS (Microsoft's Internet Information Server) on
the Content Server will use to access the share on the NAS. This domain account needs to
have both administrative rights on the Content Server and permissions over the NAS share. It
can have any name - in this topic we use MYDOMAIN\TCSNASUSER.
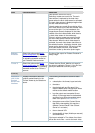
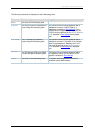
Note: The TCS Wizard can run under the following user accounts:
• a domain administrator account
• the special domain account, MYDOMAIN\TCSNASUSER
• the local administrator account