


Understanding groups & users
Cisco TelePresence Content Server 4.1 printable online
Page 77 of 121
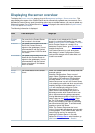
Note: Before changing authentication mode to LDAP, a site manager must add at least one LDAP
group or user with the site manager role to the Content Server. Under LDAP authentication, local
users (that is user accounts set up through the web interface for
Windows Server administration on
the Content Server machine) including the local administrator cannot log in using the login dialog.
However, the local administrator can log in by adding #page:login&rescue:true to the end of the
Content Server URL in the browser:
http://<ContentServerIPaddress>/tcs/#page:login&rescue:true.
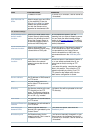
Active Directory and your Content Server is in the same domain as your
groups and users
1. Go to Management settings > Site settings. See Configuring site settings.
2. For Authentication mode select Domain.
3. So that the Content Server can obtain group information, enter the details of your LDAP server
or servers.
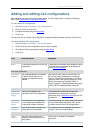
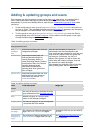
4. Go to Management settings > Groups and users. See
Adding and updating groups & users.
5. Add the domain groups or users to the Content Server in the format group.name or
DOMAINNAME (optional)\user.name: Display Name(optional)>, and assign the correct Role
(Viewer, Creator or Site manager).
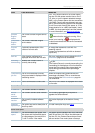
o If Allow Guest Access is enabled in
Site settings, you need to manually add all the groups
and users who you want to log in. If a user does not exist on the Content Server before
they attempt to log in for the first time, but a group to which they belong does, their account
will be created automatically and they will be given the role of viewer. When the user logs
in, their role will be whichever is higher of their group role or their individual user role.
o If Allow Guest Access is turned off in
Site settings, you only need to add the groups and
users who need a role higher than viewer (that is, creators or site managers). If a user
does not exist on the Content Server before they attempt to log in for the first time
(regardless of whether there is a group added to the Content Server that they are a
member of), their account will be created automatically and they will be given the role of
viewer. When the user logs in, their role will be whichever is higher of their group role or
their individual user role.
6. All users and all members of the added groups now automatically have access to the Content
Server using their normal Active Directory username and password. Groups and users who
have been added to the Content Server are listed in the
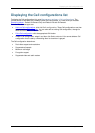
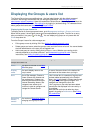
Displaying the Groups & users list: go
to Management settings > Groups and users. Their role is displayed next to the name. Note
that users may have inherited a higher role from their group membership than the one displayed
but they can find out their role after they have logged in by going to their Preferences. See
Editing user preferences.
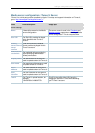
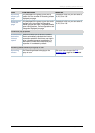
You do not use Active Directory
1. Create local user accounts on the Content Server for every user individually: go to
Management settings >Windows server and create the accounts in the normal way.
2. Go to Management settings > Site settings. See
Configuring site settings.
3. For Authentication mode select Local.
4. Go to Management settings > Groups and users. See
Adding and updating groups & users.
5. Add every user individually to the Content Server in the Add groups or users page with the
correct role (viewer, creator or site manager). See
Adding and updating groups & users. Local
users must be entered in the format: MACHINENAME\user.name:Display Name (optional). Note
that local authentication does not support groups.
6. All users now have access to the Content Server using the username and password of their
local account. Their role is the one assigned to them individually.
Users who have been added to the Content Server are listed in the
Displaying the Groups &