


11-10
Cisco ME 3400 Ethernet Access Switch Software Configuration Guide
OL-9639-06
Chapter 11 Configuring VLANs
Creating and Modifying VLANs
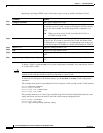
Beginning in privileged EXEC mode, follow these steps to create or modify an Ethernet VLAN:
To delete a VLAN, use the no vlan vlan-id global configuration command. You cannot delete VLAN 1
or VLANs 1002 to 1005.
Caution When you delete a VLAN, any ports assigned to that VLAN become inactive. They remain associated
with the VLAN (and thus inactive) until you assign them to a new VLAN.
To return the VLAN name to the default settings, use the no name or no mtu VLAN configuration
command.
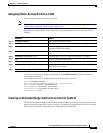
This example shows how to create Ethernet VLAN 20, name it test20, and add it to the VLAN database:
Switch# configure terminal
Switch(config)# vlan 20
Switch(config-vlan)# name test20
Switch(config-vlan)# end
This example shows how to create a new extended-range VLAN with all default characteristics, enter
config-vlan mode, and save the new VLAN in the switch startup configuration file:
Switch(config)# vlan 2000
Switch(config-vlan)# end
Switch# copy running-config startup config
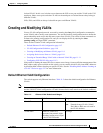
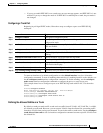
Command Purpose
Step 1
configure terminal Enter global configuration mode.
Step 2
vlan vlan-id Enter a VLAN ID, and enter VLAN configuration mode. Enter a new
VLAN ID to create a VLAN, or enter an existing VLAN ID to modify
that VLAN. The available VLAN ID range for this command is 1 to
4094.
Note When you create a new VLAN, by default the VLAN is a
UNI-ENI isolated VLAN.
Step 3
name vlan-name (Optional and supported on normal-range VLANs only) Enter a name
for the VLAN. If no name is entered for the VLAN, the default in the
VLAN database is to append the vlan-id with leading zeros to the word
VLAN. For example, VLAN0004 is a default VLAN name for VLAN 4.
Step 4
mtu mtu-size (Optional) Change the MTU size.
Step 5
end Return to privileged EXEC mode.
Step 6
show vlan {name vlan-name | id vlan-id} Verify your entries. The name option is only valid for VLAN IDs 1 to
1005.
Step 7
copy running-config startup config (Optional) Save the configuration in the switch startup configuration
file.