


34-17
Cisco ME 3400 Ethernet Access Switch Software Configuration Guide
OL-9639-06
Chapter 34 Configuring EtherChannels and Link-State Tracking
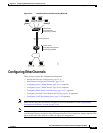
Configuring EtherChannels
This example shows how to configure an EtherChannel. It assigns two ports to channel 5 with the LACP
mode active:
Switch# configure terminal
Switch(config)# interface range gigabitethernet0/1 -2
Switch(config-if-range)# no ip address
Switch(config-if-range)# no switchport
Switch(config-if-range)# channel-group 5 mode active
Switch(config-if-range)# end
Configuring EtherChannel Load Balancing
This section describes how to configure EtherChannel load balancing by using source-based or
destination-based forwarding methods. For more information, see the
“Load Balancing and Forwarding
Methods” section on page 34-7.
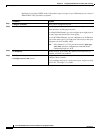
Beginning in privileged EXEC mode, follow these steps to configure EtherChannel load balancing. This
procedure is optional.
To return EtherChannel load balancing to the default configuration, use the no port-channel
load-balance global configuration command.
Command Purpose
Step 1
configure terminal Enter global configuration mode.
Step 2
port-channel load-balance {dst-ip | dst-mac |
src-dst-ip | src-dst-mac | src-ip | src-mac}
Configure an EtherChannel load-balancing method.
The default is src-mac.
Select one of these load-distribution methods:
• dst-ip—Load distribution is based on the destination-host IP
address.
• dst-mac—Load distribution is based on the destination-host
MAC address of the incoming packet.
• src-dst-ip—Load distribution is based on the
source-and-destination host-IP address.
• src-dst-mac—Load distribution is based on the
source-and-destination host-MAC address.
• src-ip—Load distribution is based on the source-host IP
address.
• src-mac—Load distribution is based on the source-MAC
address of the incoming packet.
Step 3
end Return to privileged EXEC mode.
Step 4
show etherchannel load-balance Verify your entries.
Step 5
copy running-config startup-config (Optional) Save your entries in the configuration file.