


2-2
Cisco WAN Modeling Tools Guide
OL-10426-01, Rev. A0
Chapter 2 Installing the Cisco WAN Modeling Tools
Installing the NMT
Installing the NMT
This section explains how to install the Cisco WAN Modeling Tools software and link it to your project
directories. This procedure also installs any subapplications (CET, TPI, and SSI) that came with your
copy of the NMT software. If you want to install only the subapplications, refer to the “Installing a Cisco
WAN Modeling Tools Sub-application” section later in this chapter.
The NMT Product provides both a UNIX and PC version of the NMT tool. To install the NMT on a UNIX
platform, see the “Installing the NMT on a UNIX Platform” section that follows. To install the NMT on
a PC platform, see the “Installing the NMT on a PC Platform” section later in this chapter. The
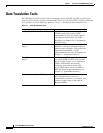
differences between UNIX and PC version of the NMT are as follows:
• The PC version of NMT uses F5 for choice list, UNIX version uses HELP or F12.
• The PC version of NMT has no support to launch the MAP command.
Note CNF files from either platform can be read by the other. For example, CNF files from a PC version of
NMT can be read by a UNIX version of NMT, and vice-versa.
Installing the NMT on a UNIX Platform
To run NMT on Unix platforms, you need to install the software first. Install the software once for each
release platform. Once the software is installed, you need to create a working directory from which you
will launch NMT.
Load the NMT Software
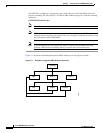
Use the following procedure to create a dedicated subdirectory that will store the NMT software. The
installation process creates a subdirectory name and a release number. For example:
/usr/users/NMT/151
Note Multiple NMT feature releases can co-exist on the UNIX platform. If a maintenance upgrade is done,
the upgraded NMT release replaces the previous release.
To create the software installation directory, perform the following steps.
Step 1 Log into the account that will own the NMT software.
Step 2 Create a dedicated directory where the NMT releases are stored.
Step 3 Verify that you are in the correct directory by entering the following command:
pwd
The path with the release number is the same path you will use when you create a working directory.