


Using the printer 2-9
User’s Guide for ImageCard® Select™ and UltraGrafix® Select™ Printers
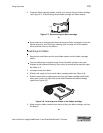
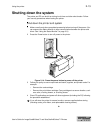
2 In the card creation application, send cards to the printer.
The printer driver receives data for each card, prepares the card for printing, and
sends each card to the printer in the order received. The printer driver keeps
cards in a queue if the printer is busy.
Developers can write card creation applications using the SmartDriver™ Software
Developer’s Kit. This kit can be downloaded from www.datacard.com.
♦
Print from a PC application
1 Select the printer settings that correspond to the cards to print. See “Working with
printer settings and data” on page 3-2 for more information. Settings might include
the following:
– Enable two-sided printing if you plan to print the front and back of the card.
– Set the margins for the area to print on the card. A setting of Edge-to-Edge is
the same as a margin of 0.
– Set the magnetic stripe format and coercivity if you plan to encode magnetic
stripe data.
2 In the application, select the Select printer as the current printer.
3 Using the application's page setup feature, set the paper size to CR80 Card 2.13"
x 3.38." Set all the margins to the same value as the driver. (You can set the
margins in the application wider than the driver, if desired.)
4 Select the orientation for the card design—either portrait or landscape.
5 Format the text to print using only a TrueType ( ) font. To print using the true
black (K) panel of the print ribbon, use the Black color selection. All other colors
are printed using the color panels of the print ribbon if you use a color print ribbon.
6 To print on the front of the card, keep data on one page. To print the front and back
of the card, send a two-page document. (Make sure Print on Both Sides is set to
Automatic or Manual.)
7 Also on the front of the card, enter the information to be encoded on the magnetic
stripe and format the text using one of the following fonts:
– Track 1—Magnetic Stripe
– Track 2—Magnetic Stripe
– Track 3—Magnetic Stripe
– Track NTT—Magnetic Stripe (use only on a PC running a Japanese language
Windows operating system)
Windows must be set to display all fonts. (Some PC’s are set to display
TrueType fonts only.) See Windows help for more information.
E
E