


116 Installing System Components
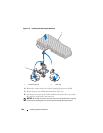
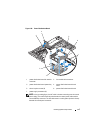
Power Distribution Board
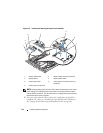
The power distribution board is located on your system directly behind the
power supply fan modules. This feature provides additional cooling to the
power supplies through the power distribution shroud that routes airflow to
the power supplies. See Figure 3-23.
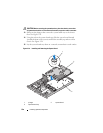
Removing the Power Distribution Board
CAUTION: Only trained service technicians are authorized to remove the system
cover and access any of the components inside the system. See your Product
Information Guide for complete information about safety precautions, working
inside the computer, and protecting against electrostatic discharge.
1
Remove the power supplies from the system. See "Removing a Power
Supply" on page 88.
2
Disconnect all cable connectors from the system board, the front control
board and the backplane. See "Removing the System Board Assembly" on
page 119, "Removing the Control Panel Assembly" on page 113, and
"Removing the Backplane Board" on page 100.
3
Locate the power distribution shroud cover and unlatch and rotate it up
until it is stopped by a detent. See Figure 3-23.
4
Remove the shroud over the power distribution board by locating and
removing the four captive screws that seat in the holes on the four corners
of the power distribution board shroud. These captive screws also align and
seat the power distribution board and shroud in the bay on the system. See
Figure 3-23.
5
Lift off of the power distribution board shroud, and then lift the board off
of the four standoffs in the system bay. See Figure 3-23.