122 Installing System Components
13
Install the processor and heat sink. See "Replacing the Processor" on
page 106.
14
Install the memory modules. See "Installing Memory Modules" on
page 104.
NOTE: Install the memory modules as noted in step 4 of the procedure in
"Removing the System Board Assembly" on page 119.
15
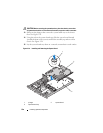
Connect the control-panel interface cable to the CTRL_PNL connector
on the system board. See Figure 6-1 for the location of the CTRL_PNL
connector.
16
If applicable, connect the optical drive interface cable to the SATA_C
connector on the system card. See Figure 6-1 for the location of the SATA
connector.
17
Install the system board shroud. See "Installing the System Board Shroud"
on page 72.
18
Close the system. See "Opening and Closing the System" on page 68.
19
If you are not replacing the RAC card, insert the plastic filler plug in the
system back panel.
NOTICE: When detaching the RAC cables from the system board, squeeze the
metal ends of the cable connectors and gently work the connector out of the
socket. Do not pull on the cable to unseat the connector. Doing so can damage the
cable.
20
Close the system. See "Closing the System" on page 69.


