


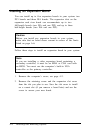

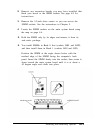
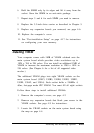
6.
Align the rounded notch in the board’s end bracket with the
threaded hole in the expansion slot frame and then insert
the retaining screw. Be sure to push the bracket up against
the screw before you tighten it or the bracket may interfere
with an adjacent expansion board.
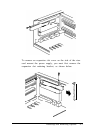
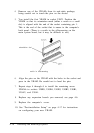
7.
If you removed the expansion slot retaining bracket to install
the board, reinstall the bracket and secure it with the
retaining screw. Refer to the illustration on page 4-7.
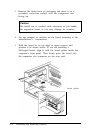
8.
Connect any internal cables to the board, if necessary
9.
Replace the computer’s cover,
10. See “Post-installation Setup” on page 4-17 for instructions
on configuring your system with the new expansion board.
Removing an Expansion Board
Follow the steps below to remove an expansion board from
your system.
Caution
Be careful not to conduct static electricity as you handle the
expansion board or you may damage its circuitry.
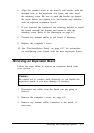
1.
Disconnect any cables from the board you are going to
remove.
2.
Remove the computer’s cover; see page 4-2.
3.
Remove any internal cables connected to the board, if
necessary.
Installing and Removing Options 4-9