


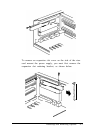

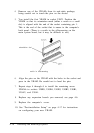

6.
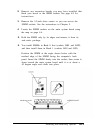
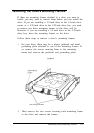
Hold the SIMM only by its edges and lift it away from the
socket. Store the SIMM in an anti-static package.
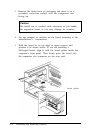
7.
Repeat steps 5 and 6 for each SIMM you need to remove.
8.
Replace the 3.5-inch drive carrier as described in Chapter 5.
9.
Replace any expansion boards you removed; see page 4-6.
10. Replace the computer’s cover.
11. See “Post-installation Setup” on page 4-17 for instructions
on configuring your new memory.
Installing
VRAM
Your computer comes with 1MB of VRAM soldered onto the
main system board which provides video resolutions up to
1024 x 768 in 256 colors. You can install an additional 1MB of
VRAM to increase the maximum resolution to 1280 x 1024 in
256 colors. (See Chapter 6 for a list of all supported video
modes.)
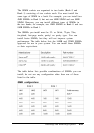
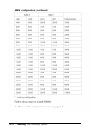
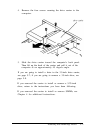
The additional VRAM plugs into eight VRAM sockets on the
main system board (Ul0Cl, Ul0B5, Ul0B4, Ul0B3, Ul0B2,
Ul0Bl, Ul0A2, and Ul0Al). Each socket holds a 256KBx 4,
60ns, fast-page mode ZIP VRAM. You must fill all eight sockets.
Follow these steps to install additional VRAMs:
1.
Remove the computer’s cover; see page 4-2.
2.
Remove any expansion boards that block your access to the
VRAM sockets. See page 4-9 for instructions.
3.
Locate the VRAM sockets on the main system board using
the map on page 4-4.
Installing and Removing Options
4-15