


Chapter 12 Hard Disk Drive (HDD) Replacement 12-7
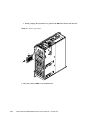
8. Mount the replacement HDD by following the removal instructions in Step 6 in
reverse order. Align the HDD with the slot guides, insert it carefully, and secure it
firmly.
Caution – Do not forcibly push the HDD when inserting it, even if it is not moving
smoothly. You may fail to insert the HDD due to the presence of any obstruction in a slot or
any problem with a connector pin; and if you forcibly insert it, serious damage may result.
Caution – Do not insert an HDD into a slot while the eject/lock lever is closed. If an HDD
is inserted in this condition, it is stopped halfway and becomes difficult to pull out.
9. Configure the HDD into the system.
From the OS, execute the cfgadm -x led=fault,mode=off <Ap_Id> command
to turn off the CHECK LED.
10. Configure the HDD into the OS.
In active replacement, operation varies by the HDD configuration.
● In Hardware RAID
Verify whether the RAID rebuild to the replaced HDD has been completed or not. For
details, see the SPARC Enterprise M3000/M4000/M5000/M8000/M9000 Servers
Administration Guide.
● In Software RAID
See the manuals for the software in use.
● Using neither hardware RAID nor software RAID
You can use the cfgadm command to configure the HDD into the Oracle Solaris OS.
After configured, conduct the necessary operation such as format, as required.
Note – When it is not in the mirrored configuration and if there are data backed up in
advance, restore the data as required.
The READY LED (green) of the HDD is turned on.
11. Close the door on the server, and lock it.