


Chapter 13 PCI Slot Device Replacement 13-23
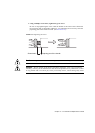
7. Ensure that the metallic underside of the wrist strap is in direct contact with your
skin.
The wrist strap should be snug around the wrist so that it does not rotate. (See Section 1.4,
“Antistatic Precautions” on page 1-9)
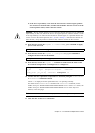
Caution – Before handling FRUs, be sure to connect the clip of the antistatic wrist strap
and of the antistatic mat to the server grounding port, and attach the band of the wrist strap
to one of your wrists. Place the FRUs on the grounded antistatic mat. Failure to take these
antistatic measures might result in serious damage.
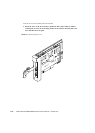
8. Remove the PCI cassette of the PCI card to be replaced. (See
FIGURE 13-2)
Caution – To disconnect the link cable, which is a cable connected between the link card
mounted on the server and external I/O expansion unit, pull the latch lock of the connector.
If you forcibly pull the connector or the cable, the cable may be damaged.
Caution – When removing cables such as LAN cable, if your finger can't reach the latch
lock of the connector, press the latch with a flathead screwdriver to remove the cable.
Forcing your finger into the clearance can cause damage to the PCI card.
a. Using a Phillips screwdriver, loosen the green screw securing the lever.
b. While grasping the upper part of the PCI cassette, pull the lever until it is
stopped, and continue pulling it to pull out the PCI cassette.
c. Place the removed PCI cassette on an antistatic mat.
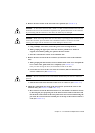
9. Remove the PCI card from the PCI cassette. (Perform the work on the antistatic
mat.)
a. While grasping the lock bracket, turn it in the direction of the arrow and push the
lever a little. Then, push in the lever completely. (See
FIGURE 13-3)
Once you start moving the lever, the lock bracket need not be held.
b. Loosen the two screws at the rear of the PCI cassette, slide out the latch, and
secure it with screws. (See
FIGURE 13-4)
Caution – Do not loosen the screws at the bottom because they are used as a reference
position.
c. Slide the PCI card in the direction of the arrow to remove it. (See
FIGURE 13-5)