


4-3
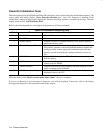
Calibration and Adjustment
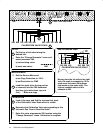
After accessing the Service and Factory Menu, scroll to the Print Calib Chart submenu and start printing the chart.
The chart contains a complete description of the following procedure:
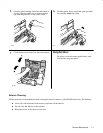
1. Remove the top portion of the chart by cutting along the dotted line.
2. Enter the Change Stored Parameter submenu and select parameter 200.
3. Write down the existing value at parameter 200, then enter a new value of 1500.
4. Press the front panel Resolution button until FINE is displayed on the front panel display.
5. Using the front panel menu, set the Copy Reduction to 100%.
6. Load the chart (with the top portion removed at the dotted line) into the automatic document feed tray and make one
copy. Make sure the chart is loaded top end first with the print side facing down.
7. Look at the copy and find the top-most visible tick mark of the Calibration Value Scale where the scale is cut off.
8. Determine the Calibration Value corresponding to this tick mark by reading the “How to Read Scale” portion of the
sample chart following this procedure. The normal range is 550 to 650 on the scale.
9. Reenter the Service and Factory Menu.
10. Scroll to the Change Stored Parameter submenu and access parameter 200.
11. Enter the Calibration Value determined from the “How to Read Scale” into parameter location 200.
12. The calibration test is complete. Check that the calibration is correct by making another copy of the chart
previously used (with the top portion removed). Ideally, one-half of the hour-glass will be visible.
A sample calibration chart is provided on the next page. Refer to it facilitate performing the procedure and to obtain
the calibration value.