


IN-tact 1101 Software Configuration Guide 7
Chapter 3: Configuring the IN-tact 1101
Overview
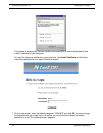
No CD-ROMs or diskettes are required to configure the IN-tact 1101. All configuration is done via
a resident Web Server application, or alternately, through a SNMP manager. Initial configuration
can only be accomplished via the Web Server application. SNMP is disabled by default. You can
connect to the Web Server application using an Internet browser. After logging in to the unit, you
can use a series of screens to configure the unit to match both the terminal configuration and
desired network settings at the point of installation. When all configuration is complete, you must
save the settings. The settings are then written to persistent memory within the device and the
device restarts. You must then log in to the device again in order to continue. The procedures
provided here assume you are configuring the unit for the first time.
The order in which you configure the IN-tact is up to you. The Web Server allows you to go to any
screen, at any time, in any order. The configuration screens are presented here in the order in
which they appear on the navigation tree of the Web Server application. However, once you are
familiar with the configuration process, you can configure the device in any order that makes
sense to you.
It is important to note that you can export a configuration from one IN-tact 1101 and import it into
another. This can save time if you are tasked with configuring multiple devices. Rather than
having to configure all of the settings on each device, you can configure one, export the
configuration, then import it into the other devices and make any necessary minor changes, such
as assigning a unique IP address to each device. Procedures for importing and exporting a
configuration are in the File Management Functions section on page 28.
Before You Begin
IMPORTANT: Read this section before beginning any configuration.