


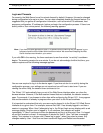
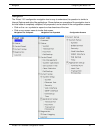

Configuring the IN-tact 1101 Using the Toolbar
16 Hypercom Corporation
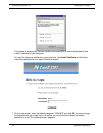
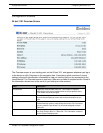
Using the Toolbar
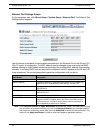
A toolbar displays near the upper-right corner of each IN-tact 1101 screen. Only the buttons
applicable to the selected screen display.
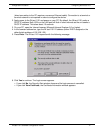
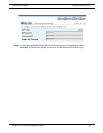
For example, most configuration screens display both an Apply and Restart button and a Save
and Continue button. Read-only screens, like Overview, display only a Help and Print button.
It is important to understand how the buttons work and which one you should use in a particular
situation. The purpose and difference between apply and restart and save and continue is
explained below.
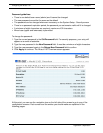
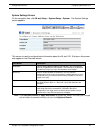
• Apply and Restart - This button writes any changes you have made to persistent memory
and immediately restarts the device so that the changes take effect. This can be valuable
when making a single change to the configuration. However, because of the time it takes to
restart the device, it is more practical to use Save and Continue if you are making multiple
changes. You must use this button after making a series of changes in order to save them.
In a few cases, like changing passwords and event logging settings, this button is labeled
Apply rather than Apply and Restart. In these cases, your changes are applied immediately
and you do not have to restart the device. However, all configuration changes require that the
changes first be written to persistent memory, then the device restarted, in order for your
changes to become effective.
• Save and Continue - This button saves your changes in temporary memory and allows you to
continue on to other settings screens without immediately restarting the device. After all
changes are made, you must click Apply and Restart in order to write the changes to
persistent memory. This is valuable when initially configuring the device or making multiple
changes. If you time out due to no activity during the configuration process, these temporary
settings are not saved and you will have to start over.
NOTE: On screens that feature advanced or related options on a second screen, any changes made on
the first screen are temporarily saved when you click Edit or Advanced to access the second
screen. You must still use Apply and Restart in order to write the changes to persistent
memory.
• Back - This button appears only on secondary Edit or Advanced option sceens. Clicking it
returns you to the previous configuration screen.
• Cancel - This button cancels any changes you have made on the current screen and resets
each field to its previous value. It does not affect any changes you have temporarily saved on
other screens. This is valuable if you have made a mistake during data entry, or just want to
“start over” on a particular settings screen during configuration.
• Help - This button opens on-line Help in a separate window for the screen that is currently
displayed. Most of the information contained in this software guide is available in on-line Help.
• Print - This button prints a copy of the current screen to your default printer. This can be
useful if you like to keep a hardcopy record of the device’s configuration.