


Configuring the IN-tact 1101 Configuration Screens
20 Hypercom Corporation
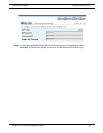
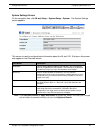
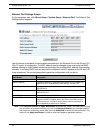
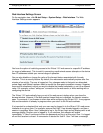
Ethernet Port Settings Screen
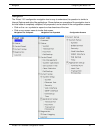
On the navigation tree, click IN-tact Setup > System Setup > Ethernet Port. The Ethernet Port
Settings screen appears:
Use this screen to set basic communication parameters for the Ethernet Port on the IN-tact 1101.
Only IP version 4 is supported. The MAC address can be changed in the rare event that MAC
address filtering or other firewall issues are preventing the provided MAC address from working
correctly. If not using DHCP, you are required to configure a valid IP address for the IN-tact 1101
to be operational. You cannot permanently save the configuration until you do so.
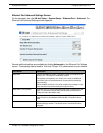
NOTE: Click Save and Continue or Apply and Restart as appropriate. Keep in mind that your changes
are not written to persistent memory until you click Apply and Restart. Any changes made on
this screen are temporarily saved when you click Advanced to access the second screen. You
must still use Apply and Restart in order to write the changes to persistent memory.
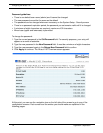
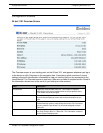
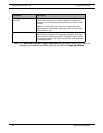
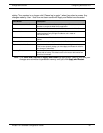
Field/Button Description
MAC Address Unique address of this IN-tact 1101.
Static IP Address Change to match the IP addressing requirements for your network. By
default, DHCP is enabled and this field displays “192.168.1.20”.
Static Subnet mask Change to match the local IP subnet of your network. The default is
255.255.255.0.
Static Gateway Address Enter the gateway address used to route IP off the local subnet. The
default is 0.0.0.0.
Static DNS Server Enter the IP address of the DNS server that should be used.
Enable DHCP Enabled by default. Click to disable DHCP and use a static IP
address. If DHCP is enabled, both of the LEDs on the LAN connector
of the IN-tact 1101 will flash in unison when the device is powered on
and is attempting to acquire an IP address.