


3-4 Service Manual
4085-001
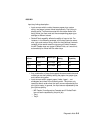
Use the following steps to enter Flash Engine Code mode:
1. Turn off the printer.
2. Press and hold the buttons identified by the “Power-On Reset
Button Functions” on page 3-1.
3. Turn on the printer. Release the buttons once the performing
self Test message is displayed.
4. Begin programming the Engine code when the Invalid Engine
Code message is displayed.
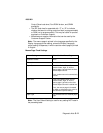
Change Ink Cartridges
When the cover is opened, the carrier moves to the far left. The user
can then replace any combination of ink cartridges. (In this position,
the printheads cannot be removed -- only the ink cartridges can be
replaced.) When the cover is closed, the carrier returns to the print
position. The ink level is on the ink cartridges, so the reported ink
level (using NPA or the Menus Page) is automatically updated.
Alternatively, there is a menu item in the Utilities Menu which can be
selected to replace an ink cartridge. Select Change Ink Cartridge
from the Utilities Menu. Open the cover and the carrier moves to the
far left and any combination of cartridges can be replaced.
If an unsupported ink cartridges is installed, an Attendance
Message is shown. This can occur if the software keys in the printer
and ink cartridge are incompatible, as in the case of an OEM printer
using Lexmark-branded ink cartridges.
Change Printheads
Select Change Printhead from the Utilities Menu. Open the cover
and the carrier moves to the middle and any combination of
printheads can be replaced.
If there is a defective or missing printhead when the cover is open,
the carrier automatically moves the printhead change location
(without the selection of the menu item).
The printhead life count is kept on the printhead itself, so the
reported life level (using NPA or the Menus Page) is automatically
updated.