Installing
Release 3.3 159
you must align with a slot on the FIM connectors. Lock each connector into position by
pushing its metal collar forward and clipping it onto the FIM connector.
7. Push the Peripheral Slot FIM Carrier fully into the slot and secure it with the card latch.
8. Remove the anti-static wrist strap.
9. Route the fiber optic cables from the Peripheral Cabinet to the SUPERSET HUB.
10. Replace the Peripheral Cabinet front and rear panels.
Install the SUPERSET HUB
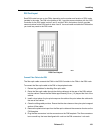
To install the SUPERSET HUB unit:
1. Attach the rubber feet to the base of the unit.
2. If required, secure the mounting brackets to the SUPERSET HUB case by using the holes
appropriate to the selected mounting position and install the unit in an equipment rack or
mount the unit on a wall. Note: The side which contains the row of RJ-45 connectors faces
the front when the unit is rack-mounted or the top when the unit is wall-mounted. If you
are wall-mounting the unit; use wall anchors that are appropriate for the wall type, use #
12 screws that are at least 1.5 inches long, and ensure that the screws are not fully
tightened so that the unit may be easily removed (without the use of a tool) for servicing.
3. Ensure that the ventilation holes are not blocked.
4. Remove the black plastic dust caps from the fiber optic cables and from the connector
ferrules on the unit.
5. Connect the fiber optic cables from the Peripheral Slot FIM Carrier in the Peripheral Cabinet
to the connectors on the SUPERSET HUB unit.
6. Connect the RJ-45 connectors to the UTP distribution panel according to the building
wiring plan.
7. Connect the power cable to a convenient wall socket. Note: The wall socket is the main
disconnect device and must, therefore, be installed near the unit and be easily accessible.
8. Program the peripheral devices.
Note: For more information, see Fiber Interface Module (FIM).
Note: Program the SUPERSET HUB as a DNI Line Card in the slot where the Peripheral
Slot FIM Carrier is inserted.


