


Chapter 2: Installation and Configuration
32
5. Select Obtain DNS Server Address Automatically if DHCP is
selected and Obtain DNS Server Address is enabled. When Obtain
DNS Server Address Automatically, the DNS information provided by
the DHCP server will be used.
6. If Use the Following DNS Server Addresses is selected, regardless
of whether DHCP is selected or not, the addresses entered in this
section will be used to connect to the DNS server.
Enter the following information if the Following DNS Server
Addresses option is selected. These addresses are the primary and
secondary DNS addresses that will be used if the primary DNS
server connection is lost due to an outage.
a. Primary DNS Server IP Address
b. Secondary DNS Server IP Address
7. When finished, click OK.
See LAN Interface Settings (on page 138) for information in configuring
this section of the Network Settings page.
Note: In some environments, the default LAN Interface Speed & Duplex
setting Autodetect (autonegotiator) does not properly set the network
parameters, which results in network issues. In these instances, setting
the KX II LAN Interface Speed & Duplex field to 100 Mbps/Full Duplex
(or whatever option is appropriate to your network) addresses the issue.
See the Network Settings (on page 135) page for more information.
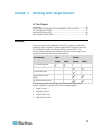
Naming Target Servers
To name the target servers:
1. Connect all of the target servers if you have not already done so.
See Step 3: Connect the Equipment for a description of connecting
the equipment.
2. Using the KX II Local Console, choose Device Settings > Port
Configuration. The Port Configuration page opens.
3. Click the Port Name of the target server you want to rename. The
Port Page opens.
4. Assign a name to identify the server connected to that port. The
name can be up to 32 characters, and alphanumeric and special
characters are allowed.
5. Click OK.