


Chapter 4 Maintaining the Sun Fire V40z Server 4-47
4.5.10.3 Replacing a CPU VRM on the CPU Card
1. Power off the server, including any attached peripherals, and disconnect the
server from the electrical outlet. If your server includes two power supplies,
ensure that both power cords are disconnected from the electrical outlet.
Refer to “Powering Off the Server and Removing the Cover” on page 4-2.
It is not necessary to remove the cover for this procedure.
2. Remove the front bezel from the server by pressing in on the rubberized buttons
on each side of the bezel, then swinging the bezel top downward (see
FIGURE 4-15).
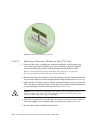
3. Open the CPU card door, which is located under the hard drive bays, to access the
CPU card. Press in the two buttons on the door and swing it downward so that it
is open 180 degrees from the closed position (see
FIGURE 4-16).
Caution – The electronic components and solder joints on the bottom of the CPU
card are fragile. Use care to avoid scraping the bottom of the CPU card on the
chassis or door when removing or installing it.
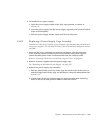
4. Open the two plastic levers on the CPU card corners simultaneously to release it
from its backplane, then carefully pull it out of the server (see
FIGURE 4-17).
5. Set the CPU card on an ESD-resistant surface.
6. Identify the CPU VRM that must be replaced.
The CPU VRM is in the inner slot, closest to the CPU.
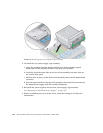
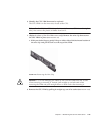
7. (Updated release of Sun Fire V40z server only) Remove the wire clip that secures
the CPU VRM in place (see
FIGURE 4-29).
a. With your index fingers, gently lift up on either side of the horizontal section of
the wire clip (arrow 1), and pull it back over the top of the VRM.
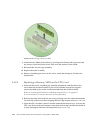
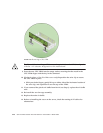
Caution – To avoid damaging the VRM, do not rock the VRM from side to side
when removing or inserting it. Instead, pull straight up on both ends when
removing the VRM and push straight down on both ends when inserting it.
8. Remove the CPU VRM by pulling it straight up, out of its socket (see
FIGURE 4-30).
Caution – When installing a VRM, ensure that pin “A1”, on the VRM, is aligned
with the “A1” reference designation on the motherboard.