


Troubleshooting
Phaser 6140 Color Laser Printer
User Guide
128
Control Panel Messages
This section includes:
• Supply Status Messages on page 128
• Error Messages on page 129
The printer uses control panel messages to indicate printer status, errors, and to provide instructions.
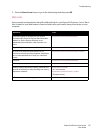
Supply Status Messages
Status messages tell you about the status of the printer and its supplies.
Note: XXX indicates one of the following: the Yellow Toner (Y), Cyan Toner (C), Magenta Toner (M),
Black Toner (K), a tray, or fuser. NNN indicates a numeric value.
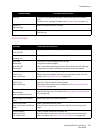
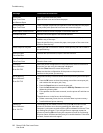
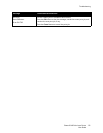
Code/Message Condition/Reason/Action
Replace Fuser
010-351
Time to replace the fuser.
Replace the old fuser with a new one and then restart the printer.
Insert Fuser
010-317
The fuser is not installed or it is incorrectly installed.
Install the fuser and then restart the printer.
Replace Imaging Unit It is time to replace the imaging unit.
Replace the imaging unit. For details, see the Imaging Unit instruction
sheet that came in the documentation packet with your printer.
Insert Imaging Unit The imaging unit is not installed.
Install the imaging unit. For details, see the Imaging Unit instruction sheet
that came in the documentation packet with your printer.
Insert XXX Cartridge The XXX toner cartridge is not installed correctly or is not installed. Install
the toner cartridge.
Replace XXX Cartridge The toner cartridge has become empty.
Replace the old toner cartridge with a new one.
Invalid XXX A toner cartridge for another region is installed, or the toner cartridge is not
seated correctly. Reseat the toner cartridge or replace the cartridge with
one that meets specifications for your printer. Your printer’s region is listed
on the Configuration page in the General section. For details on printing
the Configuration page, see Configuration Page on page 25.
Non-Xerox Toner The printer is in the custom toner mode. This means a non-Xerox toner is
installed. You may experience a decrease is print quality as a result.
Low Density
XXX Cartridge
Toner is not distributed evenly in the specified cartridge. Remove and shake
the cartridge, then reinstall it.